
Getting started with Bee-Bot Coding Robots in your classroom
What’s the BUZZ about Bee-Bots?

A Bee-Bot is an adorable little robot that looks like a bee, just like its name suggests. This hands-on device is the perfect tool to introduce coding concepts to young learners.
Bee-Bots have buttons on the top to program movement around the floor, or large table. They travel a standard distance in each direction, which is approximately thirteen centimetres. Students can program them forward, left, right, back to follow a particular path. These programmed steps are the basis of coding for beginners.
On the bottom of the Bee-Bot there are 2 switches, Power and Sound. If you turn it off when you are not using it, I find it will stay charged for a long time. When it needs charging, you can use the charging cable it comes with. The Bee-Bot sounds are fun to hear as it travels and arrives at its destination. ….but it can be a bit much if you are using them all day in your classroom or library space.
So, what do you do with them?
Now that you know the basics of what Bee-Bots can do, you can get started integrating them into your teaching practice in a more meaningful way. To keep your robot from buzzing all around your classroom, a mat is a great idea to (try!) and keep it in one place. Let me clarify, the Bee-Bot is not going to zoom around your class by itself, we’re going to use the mat to encourage our students to keep it in one area of your classroom.
First let’s talk about mats
There are two main types of mats; printed activity mats, and customizable mats. The printed mats are large pre-printed mats you can purchase with various educational concepts including numbers, shapes, landscapes and more. The second type of mat is a clear customizable mat, and this is my mat preference. They are made of thick, clear plastic with lines to separate the mat into a grid. There are different size grids to choose from (eg. 4x4, 2x6) depending on how much floor or table space you have available. The idea behind a customizable mat is that you put your own content underneath the mat in a grid formation for students to use in their coding practice. This content can be changed as much or as little as you want throughout the year.
Customizable mats also have two different options to think about. You can use a large sheet of paper underneath or separate squares to go underneath each square of the clear mat. NEW! We just got some new mats that have dry-erase squares! These have been really fun to customize with markers as we code.
Large Paper:
Pros: you can draw or print everything is on piece of paper, nothing is sliding around, you can save the papers to use them in the future
Cons: Finding paper big enough to fit underneath the mat, having to recreate the entire paper mat if it is damaged, no flexibility in the movement of the content
Separate Squares/Cards
Pros: easily draw or print square cards on a printer, only replace cards that are damaged, cards can be moved around under the mat for each coding session
Cons: keeping them organized so none are misplaced, they can slide around under the mat (but stay with me…I have some solutions!)
You don’t have the budget for a mat? You can grab some electrical/painter/washi tape and make a grid on your floor or table. Depending on the type of tape, it might leave sticky residue when you take it off later, so make sure you think about that first. Don’t make enemies with your school custodian!
Before we move on to the fun part, let me give you some tips about mats from my experience. Some mats come with pockets so you can easily slip square coding cards inside, and everything stays together. However, I have only been able to find these in the 2x6 size mats, and I prefer using a 4x4 mat. (If you find a 4x4 with pockets - please let me know!) I had to lay the paper cards out on the table, carefully laying the plastic grid mat on top and tape the corners down so the cards did not move around. Guess what? They still did move around, because kids just aren’t as careful as we would be. I also had to take the mat on and off the table as different classes came into the library each day. Frustrating and time consuming.
So, I got creative and came up a solution to end my frustration…I added my own pockets to my plastic mat! It only took me a year to finally get this done, but that’s part of the life of a procrastinator. It was a cheap and easy solution to this problem, and you can check out the steps in an upcoming blog post. Stay tuned!
TIME TO customize!

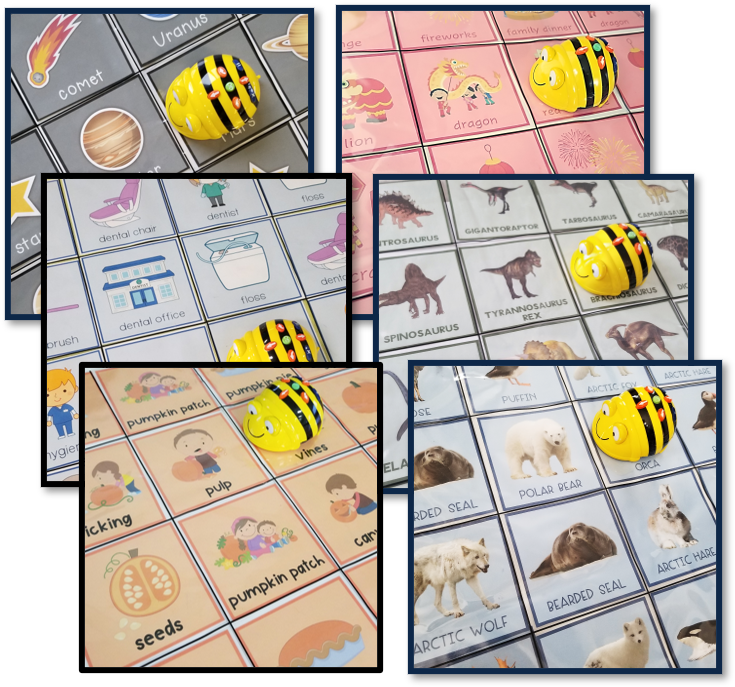
Now you’re ready to make a mat to engage your students in academic content WHILE they practice their coding skills - yay! Think about what experience your students with coding. This might be matching for beginners, or a multi-step journey around the coding mat. For beginners, I like to use a 4x4 mat with 16 cards, 2 of each different image or word. They can place the Bee-Bot on a picture of their choice, and then program the appropriate steps to reach the matching picture on the grid. If your students are beyond simple matching, you can create a grid with 16 different images. Provide students with instructions to start on a particular spot and program the Bee-Bot to travel to one (or more) different places on its journey. Eg.astronaut > Mars > star (as seen in photo)
Click above to check out my Bee-Bot coding card sets!
If you are looking to customize your Bee-Mat with cards, be sure to check out the sets I have made. So far I have Dinosaurs, Pumpkins, Arctic Animals, Dental Health, Chinese New Year, Earth Day, Space…and there will be more to come! Visit my Teachers Pay Teachers shop to take a look!
YOU’re Ready to buy a bee-bot!
These links will direct you to the Bee-Bot sections to find Bee-Bots and accessories. Be sure to let me know if you have any questions about what to buy!
Canada: Robotix Education Brault & Bouthillier (BB.ca)
USA: Amazon Lakeshore Learning
International: TTS